Wednesday, 27 March 2013

Keys to Financial Success


Although making resolutions to improve your financial situation is a good thing to do at any time of year, many people find it easier at the beginning of a new year. Regardless of when you begin, the basics remain the same. Here are top ten keys to getting ahead financially.

1. Get Paid What You're Worth and Spend Less Than You Earn
It sounds simplistic, but many people struggle with this first basic rule. Make sure you know what your job is worth in the marketplace, by conducting an evaluation of your skills, productivity, job tasks, contribution to the company, and the going rate, both inside and outside the company, for what you do. Being underpaid even a thousand dollars a year can have a significant cumulative effect over the course of your working life.
No matter how much or how little you're paid, you'll never get ahead if you spend more than you earn.
Often it's easier to spend less than it is to earn more, and a little cost-cutting effort in a number of areas can result in big savings. It doesn't always have to involve making big sacrifices.

2. Stick to a Budget
One of my favorite subjects: budgeting. It's not a four-letter word. How can you know where your money is going if you don't budget? How can you set spending and saving goals if you don't know where your money is going? You need a budget whether you make thousands or hundreds of thousands of dollars a year.

3. Pay Off Credit Card Debt
Credit card debt is the number one obstacle to getting ahead financially. Those little pieces of plastic are so easy to use, and it's so easy to forget that it's real money we're dealing with when we whip them out to pay for a purchase, large or small. Despite our good resolves to pay the balance off quickly, the reality is that we often don't, and end up paying far more for things than we would have paid if we had used cash.

4. Contribute to a Retirement Plan
If your employer has a 401(k) plan and you don't contribute to it, you're walking away from one of the best deals out there. Ask your employer if they have a 401(k) plan (or similar plan), and sign up today. If you're already contributing, try to increase your contribution. If your employer doesn't offer a retirement plan, consider an IRA.

5. Have a Savings Plan
You've heard it before: Pay yourself first! If you wait until you've met all your other financial obligations before seeing what's left over for saving, chances are you'll never have a healthy savings account or investments. Resolve to set aside a minimum of 5% to 10% of your salary for savings BEFORE you start paying your bills. Better yet, have money automatically deducted from your paycheck and deposited into a separate account.

6. Invest!
If you're contributing to a retirement plan and a savings account and you can still manage to put some money into other investments, all the better.

7. Maximize Your Employment Benefits
Employment benefits like a 401(k) plan, flexible spending accounts, medical and dental insurance, etc., are worth big bucks. Make sure you're maximizing yours and taking advantage of the ones that can save you money by reducing taxes or out-of-pocket expenses.

8. Review Your Insurance Coverages
Too many people are talked into paying too much for life and disability insurance, whether it's by adding these coverages to car loans, buying whole-life insurance policies when term-life makes more sense, or buying life insurance when you have no dependents. On the other hand, it's important that you have enough insurance to protect your dependents and your income in the case of death or disability.

9. Update Your Will
70% of Americans don't have a will. If you have dependents, no matter how little or how much you own, you need a will. If your situation isn't too complicated you can even do your own with software like WillMaker from Nolo Press. Protect your loved ones. Write a will.

10. Keep Good Records
If you don't keep good records, you're probably not claiming all your allowable income tax deductions and credits. Set up a system now and use it all year. It's much easier than scrambling to find everything at tax time, only to miss items that might have saved you money. 

Thursday, 21 March 2013

Delights of Roselle


The plant bears a berry-like fruit which is rich in vitamin C.

WHEN I was little, my mum had a plant in our backyard that bore many red fruit berries which she would use to make a drink that tasted like Ribena. It was commonly grown in my neighborhood for this purpose.
Roselle drink or hibiscus tea is made with the calyxes of roselle plants. It is rich in vitamin C andanthocyanins. The drink is bright red in colour and quite similar in taste and appearance to cranberry juice.

Roselle plants are hardy and fast growing. It is not difficult to grow. In fact, our soil and climate are well suited for growing the roselle. It would be a good beginner plant for the DIY gardener who wants to grow more edibles. If your children love juices like blackcurrant and cranberry, you can involve them in growing this plant from the seed right up to making roselle juice. It will be a valuable learning experience for them.

THE PLANT


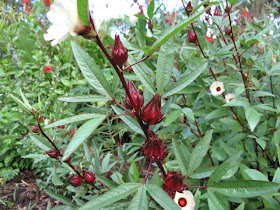
H. sabdariffa is an erect shrub with smooth red, cylindrical stems and green maple-shaped leaves. It can grow to a height of about two metres.

The flowers have a blood red centre. They do not last long, opening light yellow in the morning and turning a gorgeous pink as they wither off by mid-day. The fruit is a fleshy, juicy, dark red calyx consisting of five large sepals enclosing a green seed capsule. Each capsule contains three to four brown kidney-shaped seeds. The capsule turns from green to brown and splits open when mature.

The cultivar, H. sabdariffa var. sabdariffa race ruber, is grown for the calyxes we use in making roselle drinks. Another cultivar H. sabdariffa var. altisimer is grown commercially for the production of jute-fibre in India.

Despite its short life (about a year or less) as an annual, it is very productive. A healthy plant can easily produce about 250 calyxes per annum. If you have five to seven mature plants, you can harvest the fruit every fortnightly and have enough to give neighbours and friends.

Young shoots and leaves can be eaten raw or cooked. In India, the leaves are used to make chutney or added to curries to impart a mildly sour flavour.

HOW TO GROW

It can be grown on the ground or in a container near a sunny window or apartment balcony, as an edible or ornamental plant. It takes about three months to grow from seed to flower and another 15 to 20 days for the fruit to be ready for harvesting.

Do not plant roselle in the same spot where you have planted a previous batch. Rotate with other vegetables like okra and beans.

STEPS TO GROW

Propagation You can grow roselle plants from stem cuttings but the easiest way is from seeds.
Germination Start seeds in a seed tray, recycled containers or poly bags. They will germinate in a day or two. Success rate can be as high as 100 per cent. Transplant seedlings when they have developed the second or third set of leaves, i.e. when they are about eight to 10 cm high. Plant them about 0.6-1m apart.
Sunlight Grow in full sun.

Soil The medium should be fertile, sandy loam which is well-draining.

Water It needs regular watering when young but mature plants are quite drought tolerant.
Fertilise Apply chicken manure or diluted liquid organic fertilizer once a fortnight.

Prune Trim after harvest to control height, encourage more shoots, blooms and to prolong plant life.

Harvesting The fruits are borne in tiers along the stems. They ripen progressively from bottom up. Harvest when the sepals are already bright red but the capsule inside is still green. They are tender at this stage and can be easily plucked by hand. Regular harvesting will lead to better a yield. When fruits remain uncollected and are left to mature, the plant will eventually die.

Seed collection
•     Allocate a single plant for this purpose
•    Start collecting after the first harvest or
•    Allow the last few fruit to mature fully.

Pest and diseases May be attacked by leaf-eating green beetles and grasshoppers, juice-sucking red cotton bugs (Dysdercus cingulatus), aphids, scales and root-knot nematodes. For pest control, use organic sprays like neem oil or a homemade remedy derived from garlic, ginger and chilli. When using chemical pesticide, follow the instructions on the label carefully.

MAKING ROSELLE DRINK


You’ll need about 15-20 calyxes. Separate the calyxes from the fruit capsules. Wash, drain and cut calyxes into smaller pieces. Bring water (about 2.5 litres) to boil.

Add in the calyxes and some sugar. Simmer for 10-15 minutes to make a light refreshing drink which can be served warm or chilled and 30-45 minutes for a more concentrated syrup or cordial which you can use later.
Strain and pour into a sterilised container and store in refrigerator.

You can also add lemongrass, ginger, lemon, lime, mint or stevia leaves (a natural sweetener) to the juice.


For a Quart of Iced Rosella Tea:

Place 16-18 calyces (seeds removed) in saucepan with 1 pint of water, bring to a boil.
Boil for about 3 minutes until the water turns dark red
Turn heat off and allow to set for an additional 3 minutes
Pour into a quart jar, straining the calyces out
Add sugar to taste (about 3-4 teaspoons) and stir until sugar dissolves
Add Ice Cubes until jar is 3/4 full
Check for flavor, if too strong, add more water and/or sugar

For a cup of Hot Herbal Rosella Tea:

Place 5-6 calyces (seeds removed) in saucepan with 1 cup of water, bring to a boil.
Boil for about 3 minutes until the water turns dark red
Turn heat off and allow to set for an additional 3 minutes
Pour into a cup, straining the calyces out
Add sugar to taste and stir until sugar dissolves
Check for flavor, if too strong, add more water and/or sugar

Alternative for Hot Herbal Rosella Tea:

Place 5-6 calyces (seeds removed) in a mug or coffee cup
In saucepan, bring 1 cup of water to a boil.
Pour boiling water into cup over calyces and allow to set for 3 minutes
Add sugar to taste and stir until sugar dissolves
Check for flavor, if too strong, add more water and/or sugar


ROSELLE JAM


Prepare the fruit for jam making first soak it for a few minutes in a sink full of cold water and then drain.

Separate the red calyx (the fleshy red cover surrounding the seedpod) from the seedpod. An easy way to do this is using an apple corer pushed hard against the base of the calyx; the calyx will then separate from the seedpod.

Put the red calyx into a bowl and the seedpods into a saucepan.

Cover the seedpods with water and simmer for 10 minutes, until soft and translucent in appearance.

Strain the seedpods through a sieve and dispose of the seedpods, reserving the liquid. This process extracts pectin from the seedpods to help the jam set.

Pour the liquid back into a large saucepan, add the red calyx and simmer gently until they are very soft.

Measure this fruit pulp and add cup for cup of sugar to fruit.

Stir over a gentle heat until the sugar is completely dissolved and then bring to a boil. The jam will froth high in the saucepan and so needs to be no more than half full before you start it boiling.

Test for setting by putting an empty saucer in the freezer to chill, then put a teaspoonful of jam on the saucer, wait for it to cool slightly and then push the top of it with your finger. If it crinkles it is cooked. Another sign that it is setting to watch for is when the jam stops frothing and settles down to a hard boil.

As the jam reaches setting point it is also most likely to stick and burn so pay close attention and stir often.

Remember that the setting of a jam is a chemical reaction between the fruit acid, the sugar and the pectin, not an evaporative process. Jams set as they cool, if over-cooked the setting point may be passed and instead a thick syrup rather than a gel is formed.

Bottle the jam into clean hot jars and seal immediately.


ROSELLE JELLY 


50ml roselle juice concentrate
350ml water
2 1/2 teaspoons agar agar powder


Combine the ingredients. Pour into a mould lined with cling wrap. Unmould and serve straight away. If making jelly, just add agar agar powder to the mixture. Bring to boil mixture and pour into mould. Cool before refrigerating